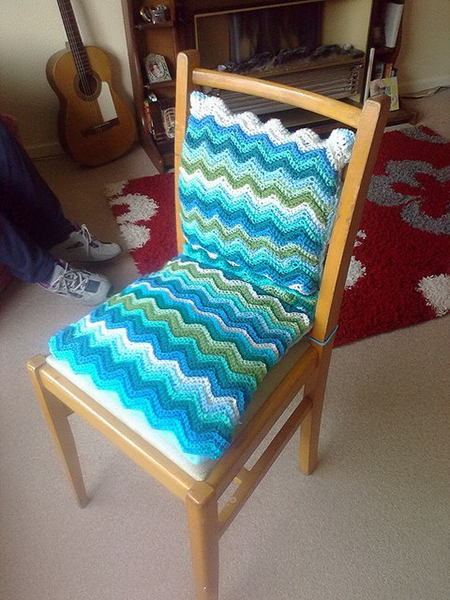
Workshop on crocheting chair covers and stools
Lovers of knitting create unique things, home decoration is no exception. For example, furniture covers help to refresh it, maintain its original appearance, and you can make them from any durable yarn. Crocheting chair covers and stools is simple, especially when using a step-by-step master class. Using your favorite color scheme and unique patterns will make the cloak unique, and you can choose a pattern according to your skill level.
Content
Types of knitted wraps for chairs and stool
Crocheting furniture covers for furniture takes a lot of time. Knitting covers for chairs are made much faster, but do not look so attractive and airy. The finished product will help to return the attractive appearance of the outdated furniture, fit it into the rest of the interior, increase the service life and make it convenient. Before you begin to create, you need to study what types of wraps are, as well as their features.
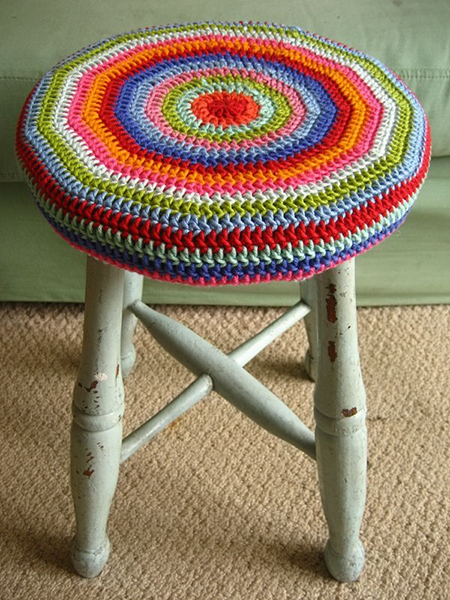
- Round crochet stool seat mats. This is the most popular variant of soft decoration for furniture. In the process, it is possible to change the color scheme.
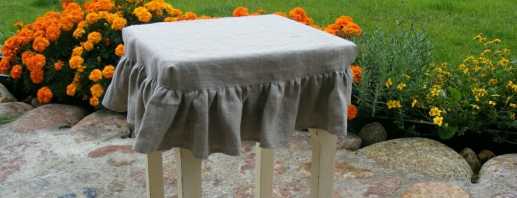
- One-piece chair covers. Production will require a little more time than the first option. If the shape of the seat is round, then the work is facilitated several times - tying corners is a painstaking work. The creation process begins with a set of air loops. There are more than ten pieces of patterns used. The work ends with the creation of an elastic sidewall that will fit on the furniture, holding the product.
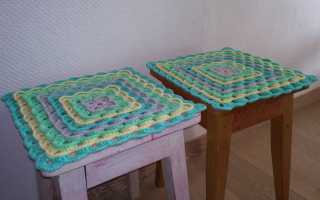
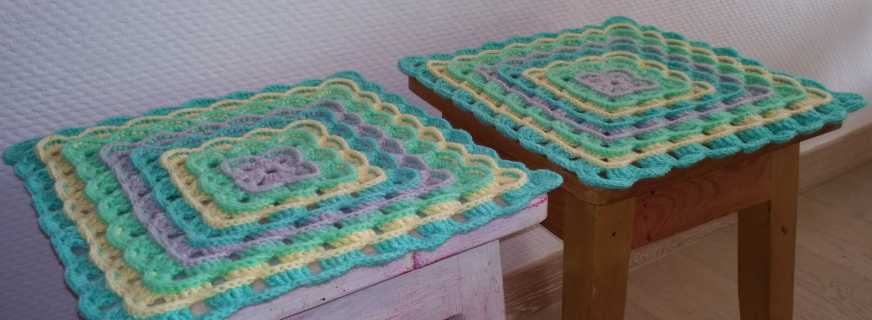
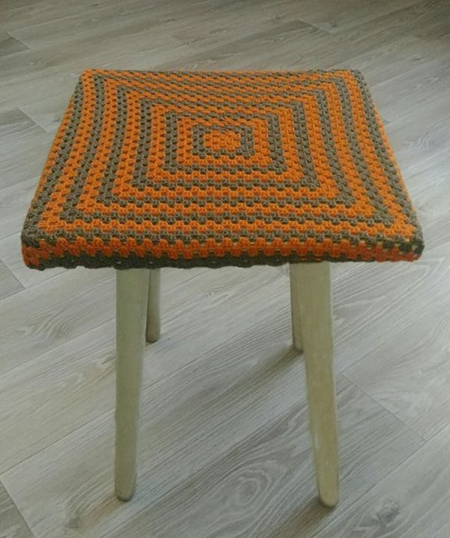
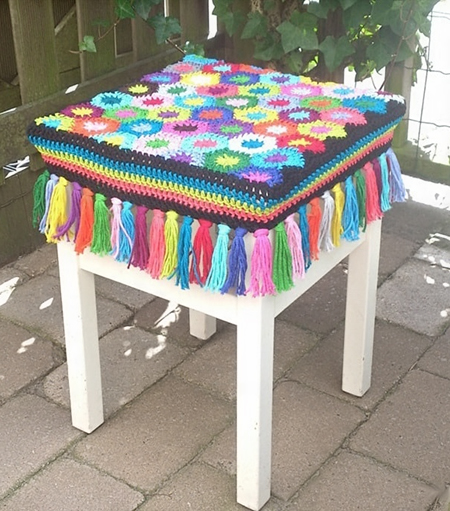
- Crochet square stool cover. Such a product will help save time for a needlewoman. The easiest way is to crochet stripes, for this you can use the remaining threads from other balls and make the details multicolored. Most often, a square cape on a chair is created dense, but you can also apply lace technique.
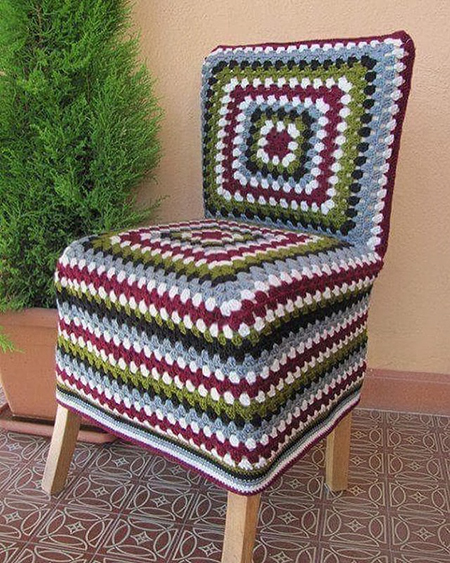
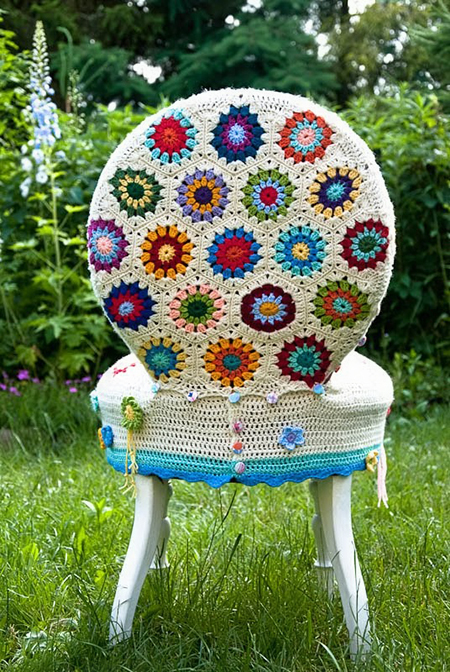
- Separate case. Such a product has two parts: a back and a seat. Each element can be made in its own color, choosing the right combination. The knitting technique is also chosen by the craftswoman.
Necessary materials and tools
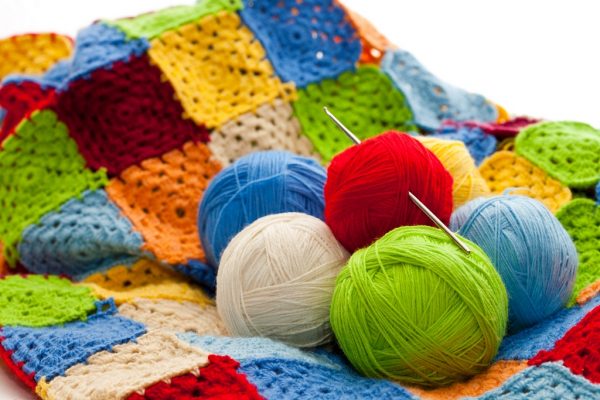
Before you begin to work, you need to familiarize yourself with the recommendations for choosing threads and tools. After examining the diagrams and description, make sure that the selected material is suitable for work. Difficulties arise in the selection of yarn. It is necessary to take into account the peculiarities of the threads, the intensity of use of the seat, so that the product lasts a long time, it is convenient.
Recommendations for choosing threads:
- do not use yarn with a high content of wool, with the exception of a cape for warming a chair or stool;
- the width should be medium (from 120 to 230 m per 100 g);
- when choosing threads of different colors and shades, it is important to take the same width of each yarn;
- needlewomen recommend choosing “Iris” threads, they are perfectly erased, the product does not sit down.
If you need to knit square, round or any other capes, use a hook that should fit in size to the yarn, but not less than 3 mm. It is recommended to create a product in three threads, so the cover will be tight.
The main condition for choosing a hook is the convenience for the craftswoman. An incorrectly selected tool will make the cloak loose. If knitting did not work out, you should reconsider the choice of the hook, its thin place should be half the thread.
Stages of manufacturing various models
Crocheting rugs and chair covers occurs in several stages. The creation of each element differs in complexity and the principle of knitting. Seat on a chair is easy, covers also require more attention, they are created according to a different scheme.
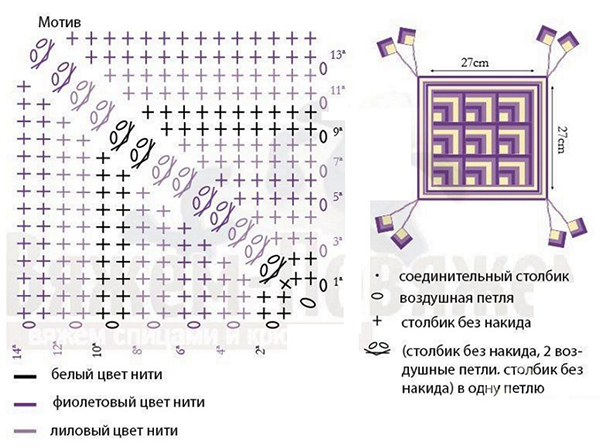
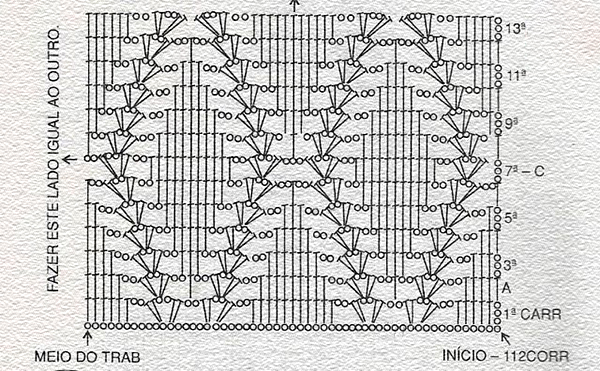
Square stool cloak
Crocheted capes and square rugs from individual motifs have become popular. Necessary materials and tools to bind the product: yarn of your favorite colors, each 50 g, hook 3 mm.
The stages according to which a wrap on the stool is created:
- Measurement of a seat for snug fit of the future product.
- Create a chain of 6 air loops. The ring is closed with a connecting loop.
- The next row is made of an air lift loop, 8 single crochet columns on the ring. End with a connecting loop.
- Knit the second row in a different color - 5 air loops (3 lifts, 2 air loops for the arch). Every third column is doubled. End the row with a connecting loop. The hook is introduced into the third air loop, the thread is pulled, the next 2 loops are created in a different color.
- In the third row, 3 air loops are made. An arch is knitted with two columns with one yarn, then 1 aerial and three more columns in an arch of two loops. Between the built-in columns is another air.
- Another thread is taken, 3 air loops are knitted, then 2 double crochets in the arch. Next 3 loops, 3 columns. After that, the pattern repeats. 3 columns, 3 air loops, 3 more columns are knitted again.
- The next row of threads of a different color is knitted according to the previous pattern. There should be three columns on each side.
- Up to 13 rows, the same scheme applies. Only the built-in columns will be more. In the latter, they are knitted 11 on the side.
- The 14th row consists of built-in double crochet columns.
- To the 17th row, the pattern repeats.
- 18-20 rows are reduced due to the passage of one arch at the corners.
- The product must be steamed, the square litter is ready.

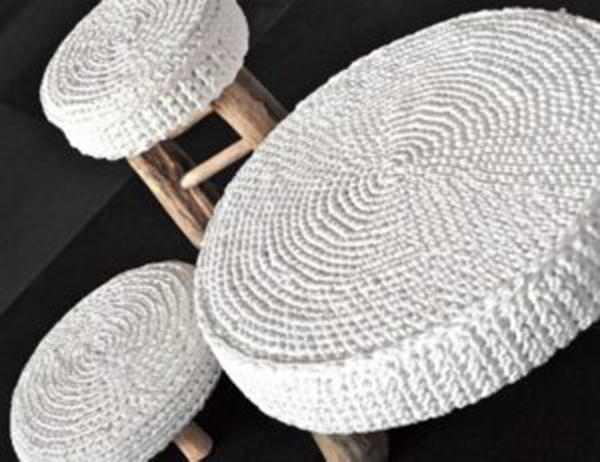
Round seat cover with sides
It is recommended to create a knitted seat cover with sides. The round shape will facilitate the work. The craftswoman will need a hook number 4, one-color yarn.
Work Stages:
- Knit the first loop. It is preferable to use the option for amigurumi.
- Knit 6 single crochet into it, so the fabric will be dense.
- Make a lifting loop. Knit single crochet with additions, for this you need to knit two in one stitch. A total of 12 pieces.
- Create as many rows as needed for the required cover size. In each row, 6 single crochet columns should be added.
- Tie a row with elastic thread connecting posts along the edge.
The cover must be knitted with a diameter of 1 centimeter less than the seat.
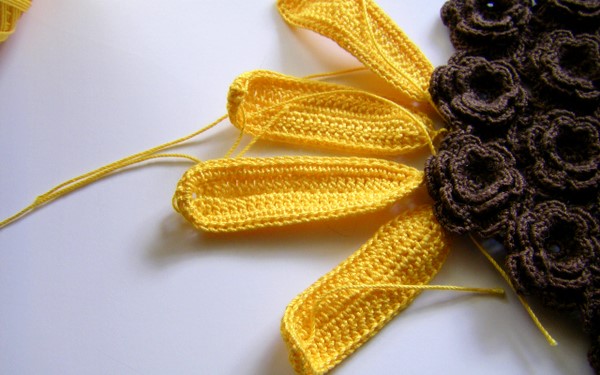
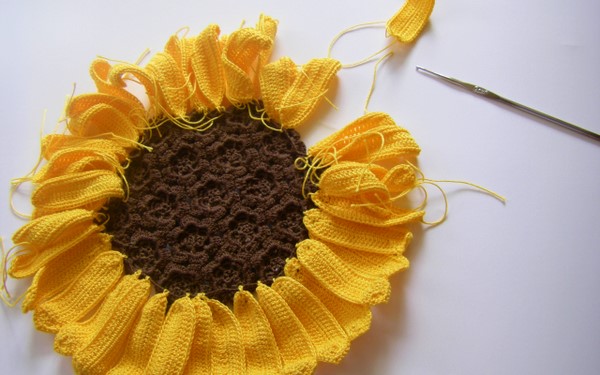
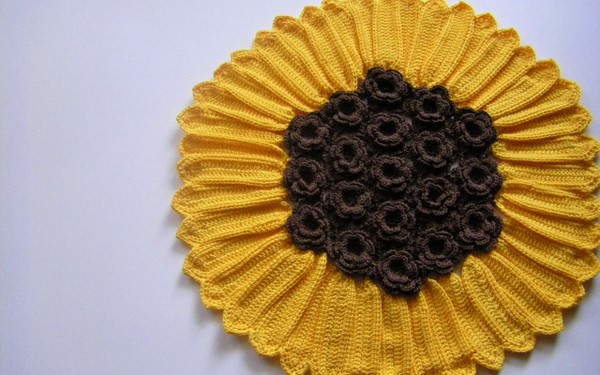
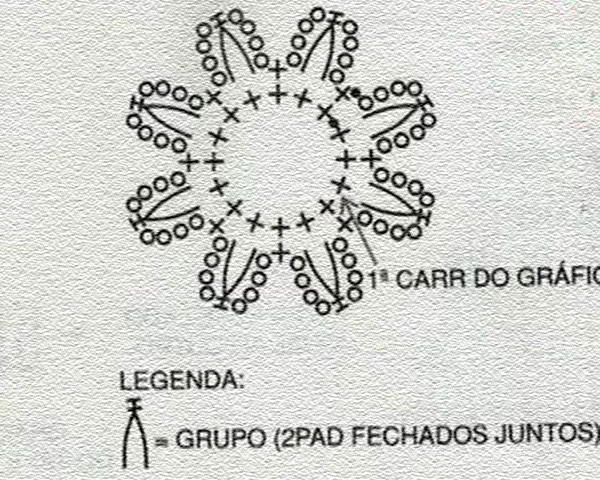
Flower mat
The chair mat is easy to crochet in the form of a flower, for example, a sunflower. You will need yellow and brown threads. The work is divided into several stages: creating the middle of the roses, knitting the petals, tying the parts.
Steps for crocheting a sunflower:
- To make brown roses from the "Iris" thread. They are easily tied with lace tape, which then should be twisted into a spiral. Scheme: 1 column + 1 air loop. In the third row, double crochet columns in each hole.
- Start the petals with a chain of air loops, tying a single crochet column on one and the other side. Next, make three rows of tying the petal around the edges.
- At the end, attach the petals with a thread to the center. Sunflower rugs will serve as decoration.
Chair cover
Crocheting a cover on the back for beginners is easy, thanks to the detailed pattern. Stages of creation:
- For work, yarn of medium thickness and hook No. 3 are required.
- The basis is the bright part, which is knitted in the form of a flower or a simple cloth. The width should match the back of the chair.
- Collect 56 loops.
- The next row begins with 6 half columns, two air loops and two half columns with one base. Then 2 air loops, 2 half-columns with one base and again 2 air. Repetition: column, aerial, column, another air loop. Then 11 columns and repeat the pattern. The row ends with 5 half-poles and three aerial loops.
- The next five rows are constructed using the same pattern. Only the number of half columns at each repetition decreases by 1 pc.
- Then there are rows to increase. The result is a mirrored reflection of the previously knitted pattern.
- Next, knit in two heights. Then the product is fastened at the side seams.
- Lace is created along the edges. There are 12 single crochet in the first row in one element. Then a single crochet, 5 stitches, another same crochet, 10 stitches, 1 single crochet. At 3 loops from the beginning of the row, a single crochet, 4 half-columns to each loop, 4 half-columns (two in one loop) and another 4 half-columns. Then the elements are repeated.
One-piece chair cover with back
For work, choose a 3 mm hook and a favorite yarn of your favorite shade. One-piece chair covers with a backrest are easy to use and fully protect furniture from external factors. In addition, they look more comfortable than ordinary seat covers.
Knitting Stages:
- Measure the width of the back and seat.
- Make a set of air loops, the number of which depends on the width of the furniture.
- It is necessary to tie the length from the hem along the seat, then through it, through the back and to the hem at the back. That is, the resulting canvas should be of such a size that it turns out to throw it through the entire chair.
- Additionally, draw air loops equal to the width of the hem and knit three sides in the same way.
- The resulting individual elements are knitted on the sides and from the back.

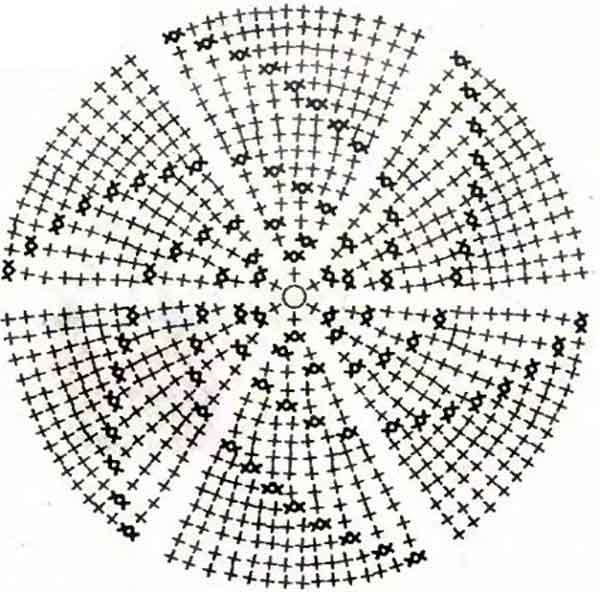
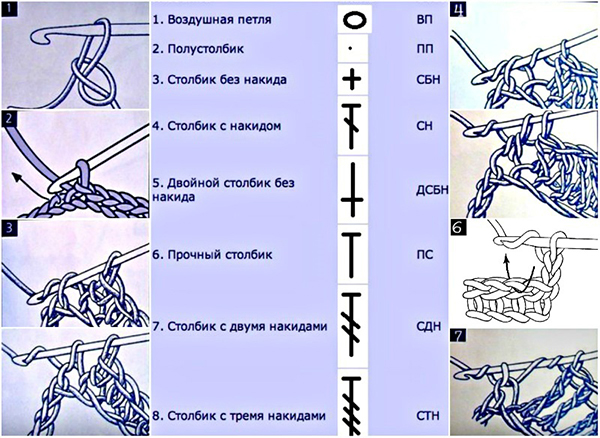
Knitting methods and decoding schemes
Knitting covers and chair covers seems difficult. If you decide on the main notation in the schemes and analyze the types of loops, then this is not so difficult. There are reading rules that you should remember:
- The scheme of ordinary knitting is read from bottom to top, circular - disassembled from the center to the edges.
- The odd row is calculated from right to left, even - from left to right.
- When knitting round wraps on stools, the wrap starts from the center. So that the radius does not increase, use lifting loops. The number of columns that are added in the next row is equal to their number in the previous row.
When crocheting with patterns, it is important to understand the conventions:
- Oval - air loops.
- A cross is a single crochet (used to increase density).
- The letter "T" is a half-column with a crochet.
- The crossed out letter "T" is a single crochet column.
- The double crossed-out letter “T” is a double crochet column.
- Three times crossed symbol “T” - three crochets.
- The letter "X" with a loop on top means a twisted column. Used at the end of knitting.
- "X" with a dash on top - knitting with a connecting loop, used for circular knitting.
In simple patterns for crocheting rugs and chair covers only the main types of loops are used: airy, columns with or without crochets, connecting, magnificent columns.This restriction does not prevent you from creating a beautiful and original wrap with a pattern.

Decoration options
Even if a chair cover or cape was created for convenience and insulation, they should be decorated. This will refresh the interior, make the product unique and interesting:
- The canvas is often decorated with tassels and lace along the edge. They are easy to diversify the square rug.
- A great option for a children's room - pompons, they harmoniously fit into a cover for the back of a chair.
- Another way to make furniture brighter is to decorate the wraps with embroidery. It is not recommended to take beads and volumetric schemes.
- The leggings became a hit - small socks on furniture legs, they complement a one-piece cover. To create such a decor is easy.
- Beads are used on the backs of chairs at the back, so the decoration will not interfere and spoil the canvas.
- Another option is bows made of fabric that matches the color. They will decorate the back of the chair.
Jewelry and knitted fabric should be designed in the same color scheme.
A square rug for a chair or stool, as well as seamlessly tied covers, will refresh the interior design and make the furniture soft and comfortable. It is recommended to knit crochet to give the fabric density and create patterns. Before you begin, you need to choose the right tool, thread, understand reading the diagrams.


Video